One question I get asked a LOT is: How do we track restricted funds so we can easily report to our funders?
The first thing I want to do is give you a HIGH FIVE because this is hugely important to tracking grants internally, reporting to funders, and ensuring that you have the systems in place to honor donor intent (i.e. using the money how the donor wants you to!)
Many organizations come us with a spreadsheet they’ve used for tracking restricted funds (like, a TRNA schedule) but they find it cumbersome, clunky, and error-prone to report to donors this way. I completely agree that this is NOT the best way to track restricted funds.
Enter: Quickbooks classes!
I’m going to walk you through, step-by-step, how to set up classes in Quickbooks Online. Now, before you send me a message saying But we don’t use Quickbooks Online!, have no fear. Do a little investigation into your accounting system to see if there’s a function like classes; they might be called segments. (Want to know which accounting system out there is best? Check out this post.)
Let’s do this!

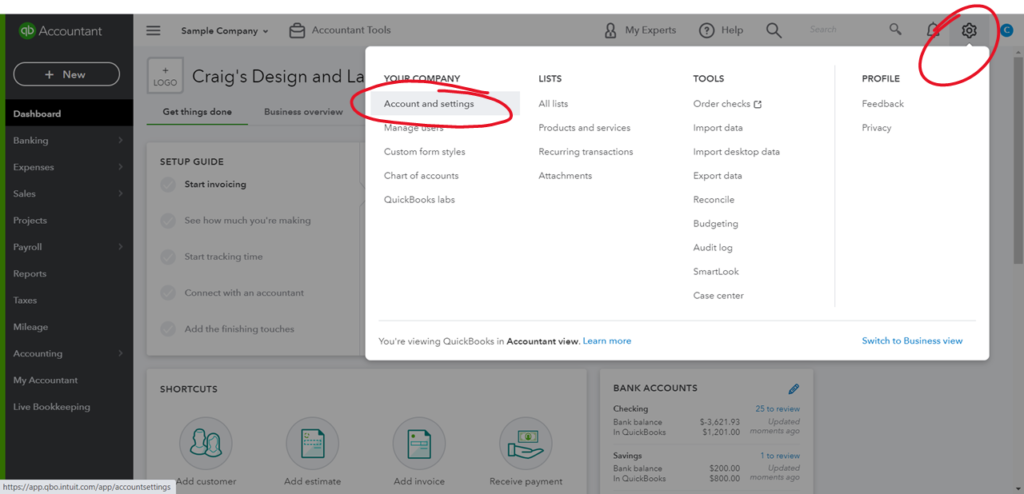
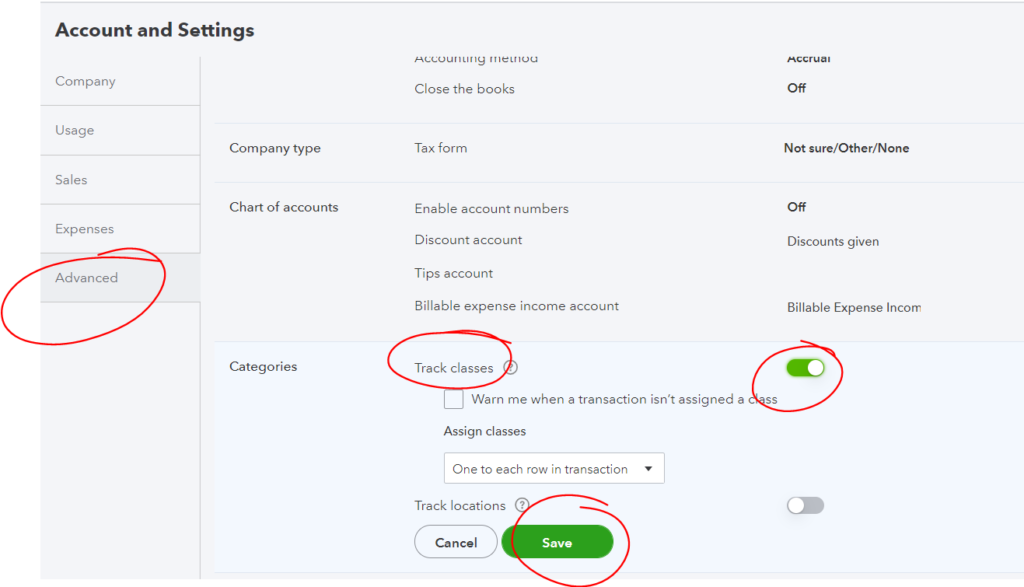
Make sure your system is set up for class tracking. Here’s the step-by-step:
- Click the gear icon in the top right corner to access the settings
- Under Your Company, click Account & Settings
- Advanced
- Under Categories, make sure Track Classes is set to On
- Click Done at the bottom
- Watch this video to see a quick tutorial!
Add custom classes to Quickbooks
I recommend starting with at least Programs, Fundraising, and Admin. This will make your Statement of Functional Expenses (in your audited financials AND the 990!) a total breeze to pull.
But remember, our end goal is to be able to track restricted funds within the accounting system, so you want to set up subclasses for each restricted funding line. Here’s the step-by-step:
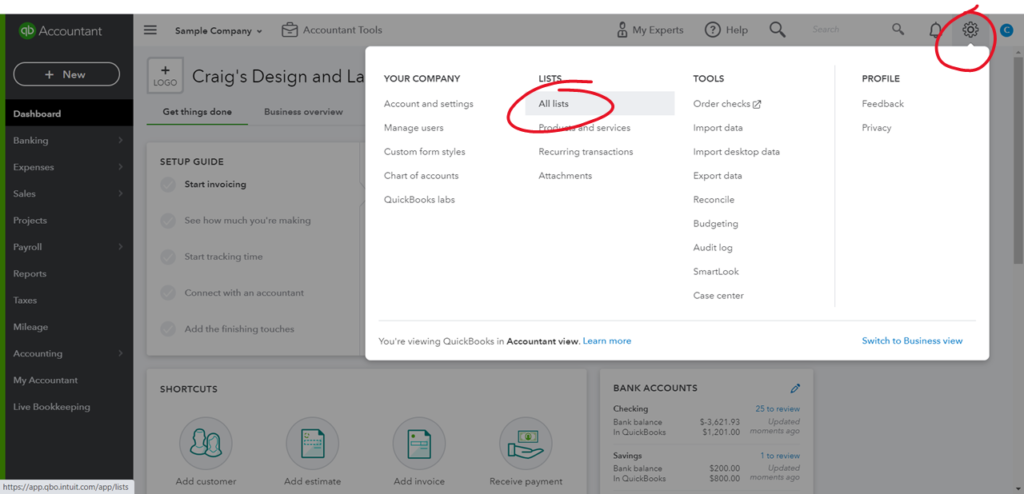
- Click the gear icon in the top right corner to access the settings
- Under Lists, click All Lists
- Click Classes
- Click New and input the class name
- Watch this video to see a quick tutorial!
Here’s an example outline of a class structure:
- Programs
- Education Program
- Restricted Grant from Smith Family Foundation
- Restricted Grant from Global Corporation
- Nutrition Program
- Restricted Grant from Jessica Smith
- Water Program
- Education Program
- Fundraising
- Admin
A few things to consider:
You may not want to set up a separate class for smaller donors because your class structure will become unwieldy QUICKLY. For example, if an individual gave your organization $500 for the Education Program, I would not set them up with their own subclass. That donation would simply get classified under the Education Program class. On the other hand, if you have a grant agreement with a larger donor who will be expecting periodic reports on how you spent their funds, then I would set them up with a separate subclass.
If you have a grant/donor whose award spans across several program areas, you may consider using Customers within Quickbooks to track their revenue and expenses, rather than Class. Use class to differentiate the expenses by program, then select Customer (donor) within the transaction.
How to track the restricted funds in your day-to-day accounting
In every transaction inside Quickbooks Online, you will see a dropdown to enter a class. Because you selected the option for Quickbooks to warn you if a transaction does not have a class assigned, you won’t be able to save the transaction without a popup from Quickbooks.
In order to ensure our reports are the most useful, you want to enter a class for every single expense and revenue transaction. Check out another quick video here!
If you’re not sure of the class when entering transactions, you can ask yourself a couple questions. If the transaction is revenue, ask yourself Is this transaction restricted to any particular program? If yes, choose the class associated with that program OR perhaps you set up that donor with its own class. If you’re entering an expense, think of the primary purpose of that expense and class it accordingly. Some expenses may be split between different classes based on their use, and that’s perfectly okay.
How to report on the restricted funds using Quickbooks Online
Now that we’ve got our classes set up and we are using them to track every single transaction, it’s time to report on them! After all, that’s why we set up this system – to be able to provide better reports to our donors, much more easily than doing them in Excel or by hand.
Here’s the step-by-step:
- Go to Reports
- Under Business Overview, click Statement of Activity by Class (it may also be called Profit & Loss by Class)
- Watch this video for more
Setting up classes in Quickbooks is going to make a huge impact on your organization. You will be able to quickly and easily report on restricted funds to your donors, analyze profitability or viability of each program, and gain more insight into your numbers to help you make better strategic decisions.
Do you want to manage your restricted funding with clarity and ease but don’t know where to start? Are you ready to truly understand your restricted funding picture so you can fundraise more strategically?

I created Master Your Restricted Funding to help you do just that! For $27, you get a Masterclass, a template to track all of your restricted grants and expenses, and I walk you through step-by-step on how to use it. This will help you revolutionize how you’re managing, analyzing, and spending your restricted funds!
Grab it here for just $27!
More Resources:
Here’s a detailed step-by-step process to managing temporarily restricted net assets >>>
Join our community to receive insightful, actionable tips on managing your nonprofit numbers >>>
Still feeling stuck? Set up a time to chat with us and see how we might be able to help >>> Schedule Here